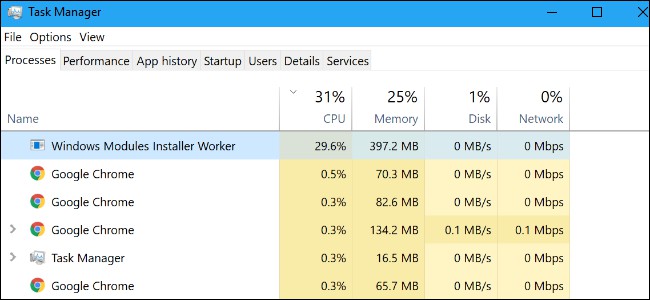
Does the screenshot above seems familiar to You? If you are on Windows 10, and you discover that the Windows Modules Installer Worker process is using a large percentage of your CPU, then you certainly are not the only one. Often encountered problem using Windows 10/8/7 is the unexplained High Disk use that at times freezes the other processes of this system? In plenty of cases, upon assessing the Task Manager, it’s discovered that the Windows Modules Installer Worker CPU and Disk Usage is extremely higher occasionally even more than 50%!
The Windows Modules Installer Worker or WMIW or TiWorker.exe checks for new updates in the Windows server and installs them onto your computer system. This process might lead to load and sometimes, push on the disc utilization to 100% freezing or hanging the processes. Restarting the machine will not work, and the problem doesn’t resolve by itself.
Windows Modules Installer Worker High CPU or High Disk Usage
Windows Modules Installer Worker(TiWorker.exe) is a Windows Update Service that looks for new Windows updates and installs them to your computer. Simple this service just checking for Windows update or installing any update, this process is running automatically by default.
Windows Modules Installer Worker running with high CPU usage is a common issue faced by the Windows 10 and windows 8.1 users. This issue is “Freezing” your system, but there is a fix and today we will show you how you can fix this issue.
Stop and disable the Windows Update service
Only when the Windows Update service is running, can Windows checks or installs updates. So if we stop and disable the Windows Update service, Windows can’t check or install any update. As a result, the Windows Module Installer Worker process won’t use a large percentage of your CPU then.
Here’s how you can do stop and disable the Windows Update service:
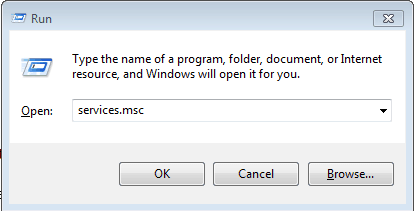
1) On your keyboard, press the Windows logo key and R at the same time to invoke the Run box.
2) Type services.msc and click OK.

3) You should then see the Services window again. Double-click Windows Update.
4) Set its startup type to be Disabled and click Stop. Then click Apply > OK.
5) The CPU usage on your computer should return to normal.


COMMENTS